It has been a while since I’ve experimented with body piercing, and although it’s not a DIY adventure that I can take credit for, it was the first time I let another person (a trained professional) pierce my face, and after spending half my life collecting a number of facial and body piercings all on my own, that’s enough of a story on its own. But a septril piercing isn’t something anyone is suited for right off the hop, and the placement I chose is even more unique and requires specific anatomy. I figured a few of you might be curious about it, especially for those of you not that familiar with body piercing and may not be too sure about what’s going on, so here’s an entry that will go into it a bit deeper for you.
My septum was pierced back in high school, pretty sure I was 15. It was a safety pin piercing like so many early ones. At this point, both nostrils were also pierced and I had 3 lower lip piercings. Unfortunately this was before I was able to photo document my modifications, and although I wasn’t a part of any online body modification forums at this point in time, I had been lurking them long enough and knew what I liked. Body modification wasn’t a common sight where I lived, and sites like BME made me bloom. Stretching began before the piercing was fully healed, and I used a lot of crap I could hide that should’ve never been in my body. When I reached 4g and 2g I finally wore some real jewellery (albeit economy grade). It was definitely a look.


Going big was always the plan, but there was no intended purpose for the piercing. I kind of just liked the fact I could stick my finger through it. Back then, I did know about septril piercings, but I only saw examples of typical placement, which is located through the middle of the underside of the nose vertically. This is possible because of a stretched septum piercing. Rhino piercings (a barbell through the tip of the nose vertically) gave me some inspiration to the possibility of a higher septril piercing, something that goes through the top of the nose instead so it looks like there’s just a small bead sitting on the nose. If you don’t get me, Google’s your friend for these piercings if you aren’t familiar. You’ll even see one of my old selfies among the crowd if you scroll through.
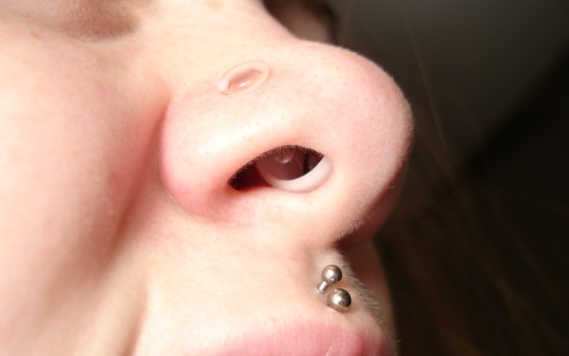
At 14mm (or 9/16″ for my american followers), there was a lot of room to play with if I chose to. This was before stacking stretched septum piercings became popular, so I mainly stuck with a nearly invisible tunnel, only occasionally throwing in a large ring as pictured above. With my smaller anatomy, the “sweet spot” (softer and thinner cartilage lower down which typically gets pierced) of my septum was totally gone, and the thicker cartilage higher up had been eroded away into a deep C crescent shape, meaning my nose became quite squishy without a tunnel in to support it. I could easily feel around for weird piercing opportunities, and I realized that my nose was about as thin as my nostrils and could easily be pierced in many higher septril-like locations. I was only 17-18 when this concept came to mind, and back then I wasn’t willing to give up wearing a tunnel and didn’t want to bother with custom jewellery, so the idea just sat in the back of my mind until more recently.
Since that larger ring style moved around a lot, it wasn’t worn much, and I got over the aesthetic and went back to smaller and more common ring styles. I got into stacking, and ordered my first custom gold clicker ring that I wore through a 14mm glass septum eyelet. I accidentally downsized to 9mm-00g in more recent years and stretched back up to only 12mm, where I began experimenting more with stacks before retiring tunnels completely. I have no idea what size it sits at now, but I feel 9mm is a pretty accurate assumption. A finger can still find its way in there pretty well.


Once tunnels/eyelets were out of the picture for good, I learned typical ring styles were too round to sit properly even in diameters I wore previously, and I had to opt for pieces with straight wearable surfaces to avoid that droopy aesthetic. With customization now being a very common and possible option for body jewellery, I can now get whatever I need for my anatomy, but I began with some more basic options first to see what I liked.


Retiring my nostril piercings had been on my mind for a while. They were among my first DIY piercings, never retired or repierced. They always had some sentimental value so I kept them even though they aren’t aligned well, just in case I wanted to have them fixed as is (punching them slightly larger was in mind). Once I decided to at least downsize the nostrils without wearing any jewellery, the septril idea came back into my head. My nose would just look too simple without the 6g nostril piercings that I spent forever trying to stretch, but I wanted something to call my own this time, something just a little bit out of the box.
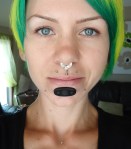
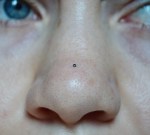
At first, I never considered anything custom for the piercing. I just wanted a tiny little gold bead on the center of my nose. I felt around for the right location and made sure that it looked good, and sent an inquiry to Daniel at Thrive Studios out in Cambridge, Ontario to see what he thought. It was my first time bringing up the piercing idea to a professional, and I still had not seen anyone attempt this placement on social media (though I knew of one other from my BME days who was planning on trying it, and I’ve seen a couple similar examples now after looking stuff up while writing this).
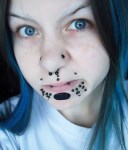
The in-person consultation went well and we decided to do the piercing that day without the gold jewellery (October 2017). I wore a larger temporary threadless moonstone end until what I wanted to wear came in stock. Check out Dan’s Instagram (@dan_flair_) for a few shots of how it looked initially if you’re curious. I didn’t really take any photos then.
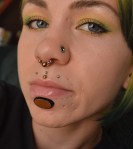
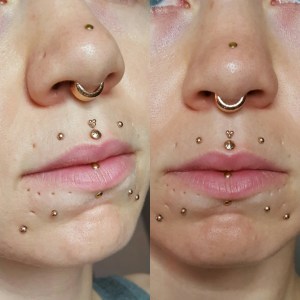
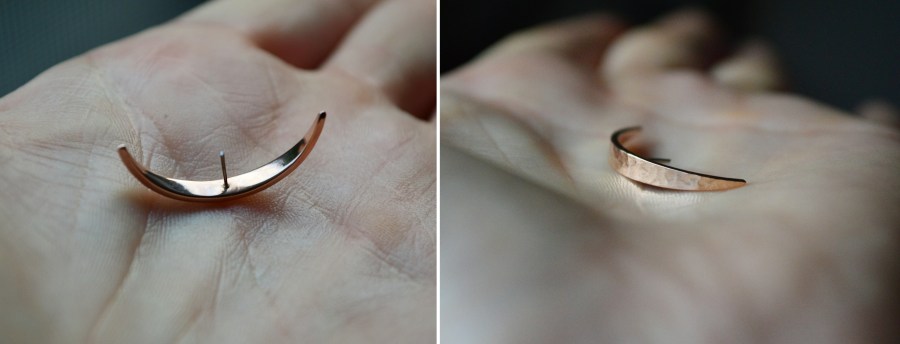
Once the internet saw it, there were a number of jewellery suggestions thrown out, and it sparked interest in a custom statement piece. Nothing crazy fancy or expensive, just something in rose gold to match my set now. I liked the idea of a contoured shield that was suggested, but I wanted to start smaller and see how it weathered daily life. After building scale ideas out of wire to figure out measurements, I decided on a crescent shape with a hammered finish, and went back to Dan to see what he thought.

The piercing itself healed pretty smoothly, but was definitely slower than something more fleshy, like my 6g lobes that felt healed within a week (go check out that Mod monday entry!). It did flare up mildly during the healing period a handful of times, but nothing all that noticeable physically, it was discomfort that brought my attention to it. I luckily avoided any encounters with the dreaded piercing bump so typical of nose and ear cartilage piercings. I used aftercare spray sold at the shop twice a day which was also my first time trying a spray, and it seemed to make the piercing feel much less irritated. And no, it didn’t hurt to get done, either.
Dan seemed unsure of my concept at first, but after sharing my drawing with measurements I feel like he jumped on board and knew I was serious. It took some time to get the piece with the typical insane wait times and having it sent back for revisions. Naturally I nitpicked the fit until it was perfect and likely drove Dan mad while he was installing it on me. I’m glad people humour my ideas and put up with me when I actually do reach out to have work done. I know I can be a bit particular, haha.
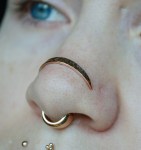
This piece is threadless, meaning it doesn’t have any threads either on the post or on the end to attach them together. Instead, the jewellery is held together with tension from a pin that’s slightly bent while inserting it into a post (Google images NeoMetal for visuals). This piercing is my first experience with threadless, and I love it. With the small gold bead and the initial moonstone end I wore during healing, the fit felt very secure. This crescent piece is a little less so, and it did pop loose once while violently wiping my nose after sneezing excessively (pollen season yay!). I managed to find a good fit and get everything back together pretty easily on my own, but I’ll be swapping out the crescent for the more secure gold bead before leaving for bike rides in the bush or other vigorous activities from now on. Otherwise, it’s fairly comfortable. I do feel it, but it isn’t annoying or irritating. It is basically floating on top of my nose and I only notice the tips lightly. I was surprised by how quickly the piercing adjusted to the piece. It didn’t even flare up like I thought it would after being installed, and it doesn’t flip or shift around as much as I thought it might either. The shorter post helps keep it snug and in the proper position, yet still allows enough movement for washing my face and doing skincare. It turned out to be quite successful aesthetically and still pretty practical, and I’m glad that Dan was willing to play a part in making this happen. Click through any image for a better look.


Feel free to throw any questions or comments my way! Discussion about body modification is always welcome and I don’t get to do it enough anymore.

Loving this post! Thanks so much for the insight into the process for this sort of a piercing. Props to the amount of dedication that went into something like this. You’re gorgeous!!
LikeLike
Hey, look at that!
The piece looks great and looks like it fits you well.
Been wondering how you’ve been, good I hope.
Take care.
LikeLike